The Builder tool within StoneHearth is an in-depth tool that allows the user to design and create buildings for their hearthlings to live in.
From the very start of the game, the player is able to build to their heart's content, only limited by the objects they can make in their town, and their own imagination.
Building is one of the key gameplay features of Stonehearth. Players can place pre-fabricated building templates (designed by the developers or other players[1]) anywhere on the map and idle hearthlings will rush over with gathered materials / furniture to build the structure.
Building templates can be edited and saved before placement, allowing specialized customization.
Furniture that isn't in your Inventory at the time a building template is placed, are automatically queued in the relevant Workshop.
Mechanics[ | ]
The builder ui as found in the game
//TO BE EDITED FURTHER, WILL EXPLAIN EVERY ASPECT OF THE BUILDER//
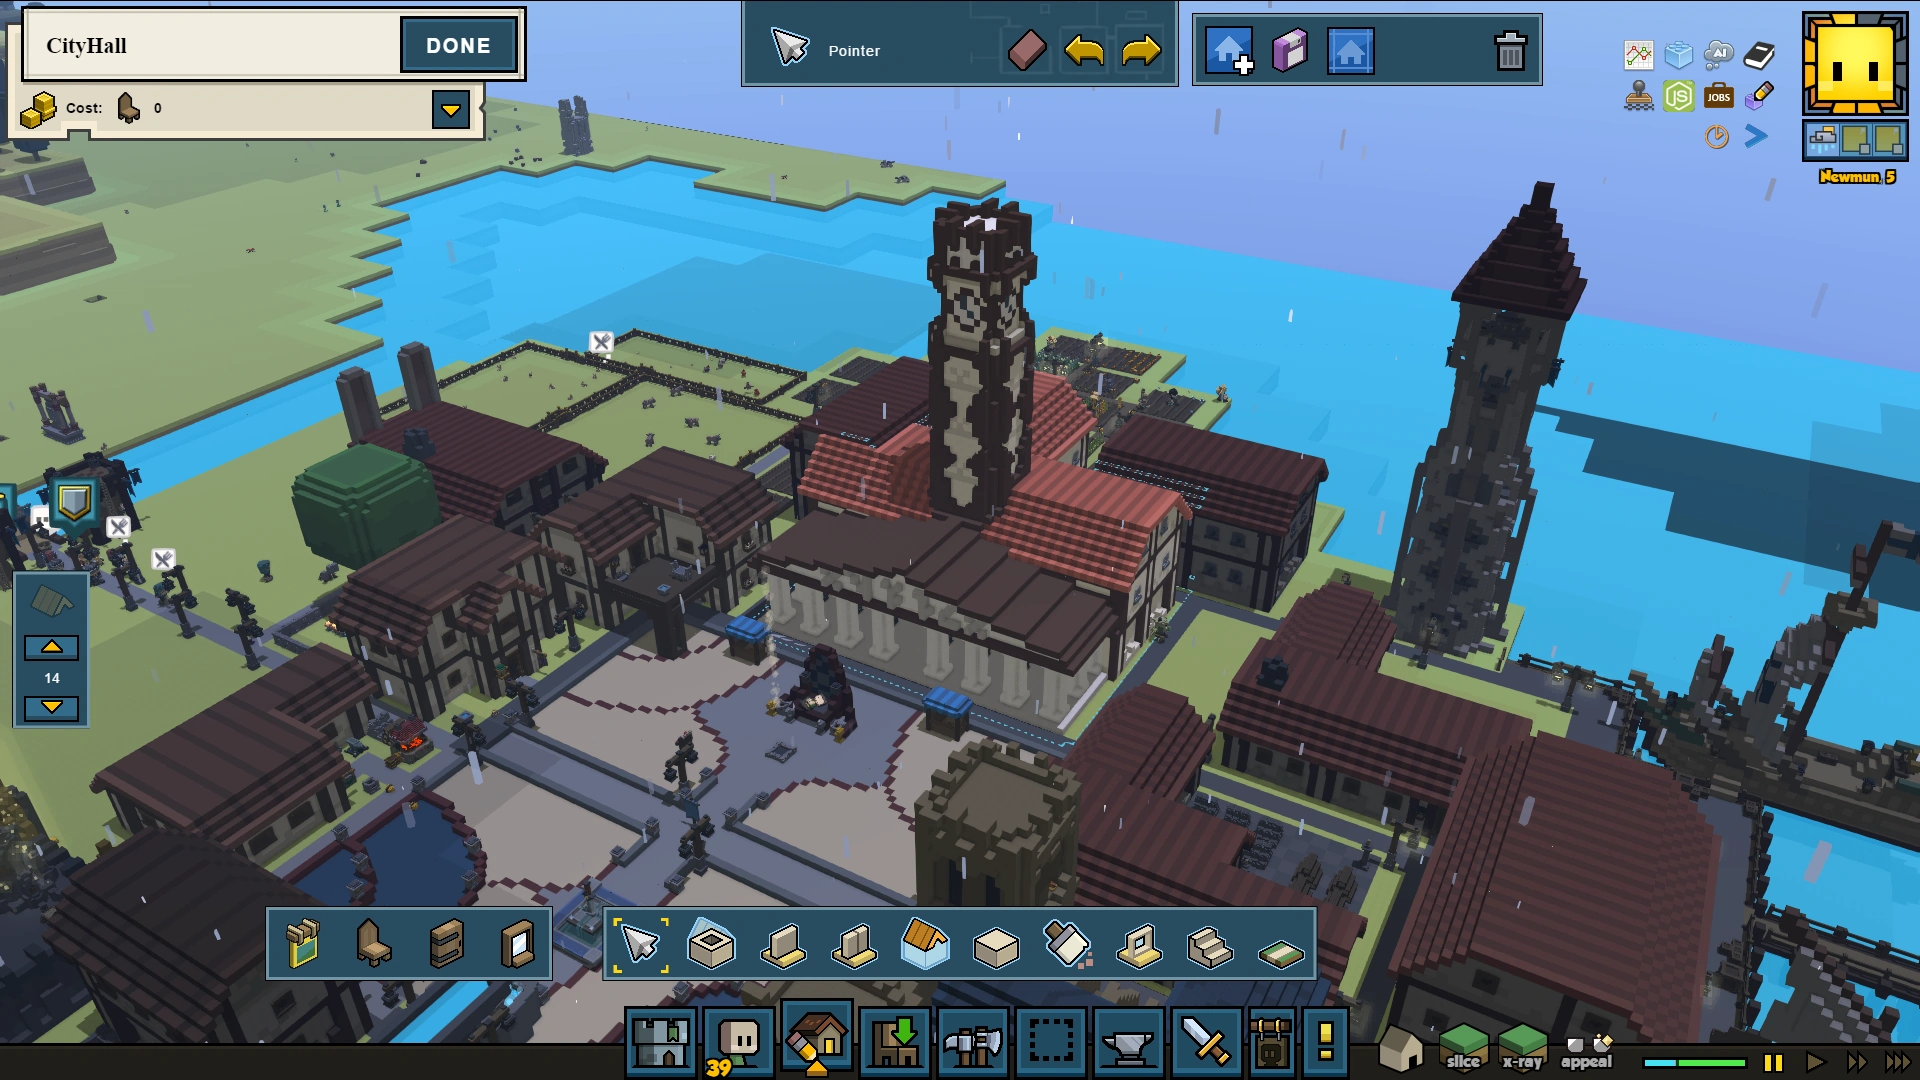
The StoneHearth builder tool is an in-depth tool with many different aspects that each will be explained individually. Below, these aspects are explained and described. Before we start, something has to be quite clear about the builder tool as often people misunderstand it. The builder tool works with templates. Different templates of buildings that are build. You can work in different templates. In the top right of the screen is a box with the name of the template you are currently working on. And you can switch templaye by using the pointer tool and click on the template you want to edit.
To see where your current template ends, and the next template begins, is quite simple. The template you are working in at the moment has it's full colours, whilst the other templates are darker.
Main Tools[ | ]
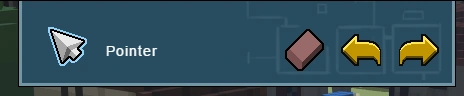
In the image above, you see three things. Firstly, an icon followed by the word "pointer". This bit shows which tool you are currently using. A very handy tool, may you ever forget what you're working with.
Followed by that, you can find the eraser tool. This tool removes a single object. To do this, hover over anything, and it will light up red. If you click it, the area that was highlighted will be erased. To verify, an 'object' in this case is either a single piece of furniture, a door, window, or an entire wall. This tool does not erase single blocks, as multiple blocks still create a single object.
Last, you have two arrows. Those are the "undo" and "redo" buttons. Everytime you add, remove, or change something in your template, that's an action. When you press "undo" you can go back one action, and remove your previous change. You can do this multiple times, undoing multiple action. When you press "redo", you will redo the last action you undid. You can do this as many times until you are back to your last action. An important bit about this is that the undo and redo histories aren't confined to just one player. Rather, this is a shared history. If you are building in multiplayer, and you try to undo your action, it is possible that a second player performed an action shortly after you, which results in you undoing his action, rather than his own.
| Icon | Name | Type | Description |
|---|---|---|---|

|
Remove Object | Tool | Allows players to remove an object. |
 
|
Undo/Redo | Tool | Allows player to undo and redo actions |
Template Tools[ | ]
In the image above, you can see the template tool icons. The first one is rather simple, as it creates a new template. When you click it, the game will ask you if you want to start a new building project, and when you click "Yes" the game will create a new template for you to work in.
Followed by that, you have the "Save Template" icon. When pressed, the game will ask you if you want to save your current building as a template. When you click yes, the game will save your current template, the one you're working in, in your templates.
The next icon is your templates list. When clicked, a menu will open you can scroll through, containing all your templates. There is a search bar to help search for the specific template wanted. When you want to place down your template, click on the template you want to choose and move your cursor into the world. From there, around the cursor your template will form and you can choose to move it around. You can rotate your template with the "<" and ">" keys. Placing down your template can easily be done by simply clicking.
The last icon is the "Destroy" or "Trash" icon. This icon will simply remove the entire template and building you have currently selected. The game will ask you if you are sure before it removes the building, but be careful as once removed, it cannot be undone.
| Icon | Name | Type | Description |
|---|---|---|---|
| New Template | Tool | Allows players to create a new template | |
| Save Template | Save | Allows the player to save his current design as a template | |
| Templates | Drop-down menu | Opens a list of the player's templates | |

|
Trash | Tool | Allows the player to trash his current template. WARNING: This action cannot be undone |
Template name and Costs[ | ]

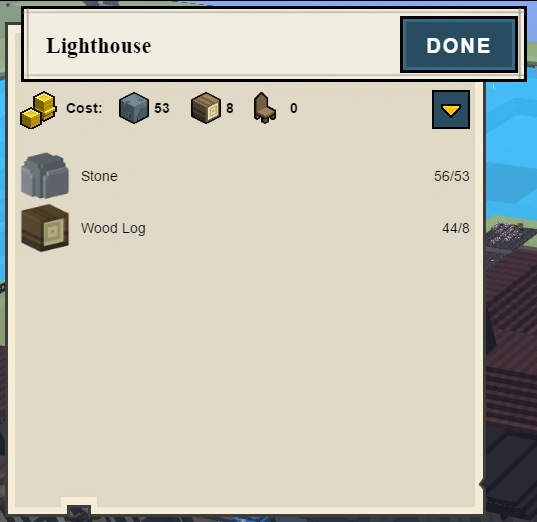
The template tools and templates as shown within the game
This section describes three things. The name of your template. The status of your template, and lastly the costs of your template.
The name of your template by default is a number. This generally is the number of your template. So your very first template will start at 1, whilst your 50th template will by default be named 50. To edit this, simply click into the text and write away to your heart's content. Just don't forget to press enter after you're happy with your name.
The "Status" button, also known as the "Build" button is the button that shows the current state of your building. In the image above, the status is done, as in that example the building had finished building. When you are still designing your template, the button will display "Build", as when it's clicked your template will be build by your hearthlings. When your hearthlings are building your template, the button will display "pause", as when clicked, you can pause the building of the building. When the building's building is paused, the button will display "resume", as when clicked you can resume the building of the building.
Lastly, we have the costs of your building. By default, this list isn't expanded. In order to expand it and get a more detailed list of all the objects and materials needed for your template, you can expand the list by clicking the downwards triangle at the end of the section. When clicked, the list will expand.
Within this list, you can find every single material that you still need for this building. As the hearthlings are building it, this list will slowly get smaller and smaller, untill nothing is in it anymore and the building has been completed. A handy tool if you want to know what hasn't been made for your building yet.
Material Picker[ | ]

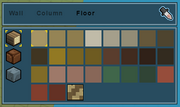
The material picker of the builder ui. The image may vary per build tool
This little section isn't always visible, and doesn't always show the same for every tool. It is relative to the tool you're currently using, wether this is the rooms tool, walls tool, single-block tool, or the stairs tool. Depending on the tool you're using, colours and patterns may vary.
This tool exists out of two boxes. Firstly, you have the top box. This box contains two things. The first thing are the sections. In the example above, you can see the words "Wall", "Column", and "Floor". Two are greyed out, and the third is a full black. The full black indicates for what you're picking the material, and this can easily be swapped by clicking on one of the greyed out words. Using this, you can change the materials of different aspects of your current tool. The second thing is the material picker. It's the icon to the right. When clicking this, you can click on any block, even from other templates, and the game will automatically select that material. Be careful, because if you click twice the game will register the second click as a click with the pointer, which may result in you clicking into another template.
Then, below that you have the second box. This box contains all your materials. To the right, you have the choice of your material type. By default, this is "wood", "clay", and "stone", though it's possible to add more through mods. Your current type is shown by the four yellow corners around the icon, and type can easily be switched by simply clicking on it.
Now, for the colour of the material you have your pallet besides your material types. This works exactly the same way as your type selection.
Build Tools[ | ]


The toolbar
Overview[ | ]
| Icon | Name | Short Description |
|---|---|---|

|
Pointer | Used to select parts of your building |

|
Rooms | Used to create square rooms with flooring and walls included |

|
Walls | Used to place single walls, e.g. in the middle of a room to subdivide it |

|
Split Walls | Used to split an existing wall into to to be able to independently adapt them |

|
Roofs | Used to create a roof over an area that preferably is enclosed by walls |

|
Blocks | Used to place single blocks, e.g. to decorate existing structures |

|
Paint | Used to give an existing material another look |

|
Holes | Used to carve out holes from walls to later insert doors or windows
Can also be used to open holes in floors or ceilings to let stairs go through |

|
Stairs | Used to place a stair |

|
Roads | Used to place roads into the ground |
Pointer[ | ]
t.b.d
Rooms[ | ]
t.b.d.
Walls[ | ]
t.b.d.
Split Walls[ | ]
t.b.d.
Roofs[ | ]
t.b.d.
Blocks[ | ]
t.b.d.
Paint[ | ]
t.b.d.
Holes[ | ]
t.b.d.
Stairs[ | ]
t.b.d.
Roads[ | ]
t.b.d.
Object Tools[ | ]

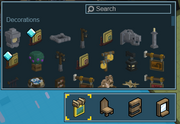
The objects section of the builder ui.
The object tool is rather simple and easy to use. You have four categories. "Decoration", "Furniture", "Doors", and "Windows". When you click on any of these categories, an larger box will open as shown above, showing every object of that category. In decoration and furniture, the objects are even further categorized by sub-categories to make finding objects easier, though you can also use the search bar at the top.
To place an object, simply select the object you want to place, and place it anywhere in the world. Some object can go on walls, and in the case of doors and windows, even inside walls. All objects can be placed on the ground, except wall-mounted objects such as signs. Those have to be placed on a wall.
| Icon | Name | Type | Description |
|---|---|---|---|

|
Decoration | Tool | Opens a list of all decorations and allows players to select and place decorations |

|
Furniture | Tool | Opens a list of all furniture and allows players to select and place furniture |
|
Doors | Tool | Opens a list of all doors and allows players to select and place doors |
|
Windows | Tool | Opens a list of all windows and allows players to select and place windows |
Troubleshooting Tips[ | ]
When placing a building, be mindful that your hearthlings will need to be able to access all parts of the building. They will need 2 spaces around a building to place scaffolding (ladders) to get there in addition for space(s) per overhang. If building ceases to progress:
- Ensure that workers can reach all remaining blocks (within 2 or 3 spaces). It's thus suggested to not build too close to a mountain, cliff or water feature.
- Ensure you have the required items (Fine items are not equivalent to normal items).
- Also ensure that the required items are pathable. (Is there a wall, fence, tree, locked door, cliff, etc. in between the building and required material?)
- Ensure that placed furniture is accessible, not floating and not too close to the ceiling.
- Ensure that there are available Workers / builders with no higher priority tasks (e.g. food / sleep / cowering)
- Try placing a ladder manually to non-accessible areas.
- Select the building, click "Pause Building", do something else for a bit, select the building and click "Continue Building", manually place a ladder to the next area which should be built
- If the building itself is finished but furniture is missing, try manually destroying unneeded ladders that are blocking the placement of a piece of furniture (Ctrl + C and then type destroy).
- Try saving and restarting Stonehearth
- As a last resort, Debug mode can instant build the building (Ctrl + C and then type ib). This uses no resources.
Example - Inadequate Space to Create Ladder:
You've placed a building next to a mountain / tree / fence. Work halts when building the upper walls as they cannot create a ladder.
You clear the mountain / tree / fence. You manually create a ladder to the next step of work. The hearthlings rush to gather resources and recommence work.
Example - Ladder Interrupts Furniture Placement:
Your building design involves an item placed under a window. Work halts after the building is constructed as workers created a ladder to put in the window and cannot place the on-ground item (due to the ladder). You delete the ladder. The hearthlings rush to place the remaining furniture.
Current Building Features[ | ]
Structures:
- Place Building | Shortcut B
- Design Custom Building | Shortcut Shift B
Items:
- Place Item | Shortcut p
- Construct Ladder | Shortcut l
NB. If you place certain items manually (i.e. via Place Item rather than Place Building) you will not be able to move / remove them outside of Debug mode (Ctrl + C and then type destroy). An example is a Door (in comparison to movable tunnel doors)
NB. Ladders no longer require accessible wood. They are also automatically placed / destroyed by hearthlings when constructing buildings or placing objects.
Building Materials[ | ]
- Wood resource
- Stone resource
- Clay resource
Furniture[ | ]
When Designing a custom building, any place-able items (e.g. Furniture, Workbenches, Decorations) that are currently able to be crafted by the player, can be placed into the custom building. For pre-made buildings, if you are not yet able to construct an item, the building can still be placed, but will not be able to be finished until you can create and place the required items.
References[ | ]
- ↑ https://steamcommunity.com/workshop/browse/?appid=253250&requiredtags[]=Building+Templates